

How to Roll a Joint: The Ultimate Step-by-Step Guide
There are few rituals in the world of cannabis as iconic, personal, and satisfying as rolling a joint. While glass pipes, vape cartridges, and high-tech rigs have their place, the joint remains the universal symbol of cannabis consumption. It is portable, social, and requires nothing but a little dexterity and patience. However, for the uninitiated, the process can be intimidating. A poorly rolled joint can run (burn unevenly), clog, or fall apart, ruining what should be a relaxing experience.
This guide is designed to take you from a complete novice to a confident roller. We will move beyond the basic mechanics and explore the “why” behind every step-from the physics of airflow to the chemistry of the gum line. Whether you are rolling up for a solo session or preparing to share with friends, this is everything you need to know to master the art of the roll.
If you find the process too tedious, you can always explore premium Pre-Rolls, but for those who want to learn the craft, read on.
Part 1: The Mise en Place (Preparation)
In the culinary world, chefs use the term mise en place to describe setting up their station before cooking. Rolling a perfect joint requires the same mindset. Before you even touch a rolling paper, you need to ensure you have the right tools and environment. Trying to roll on a windy balcony with no tray and sticky fingers is a recipe for frustration.
The Essential Toolkit
- Cannabis: The star of the show. The quality of your flower dictates the quality of your smoke. Fresh, properly cured buds like London Marker AAAA or Blueberry Bubba will break down into a fluffy consistency that rolls easily. Over-dry weed turns to dust, which clogs the joint; wet weed won’t burn.
- Rolling Papers: Papers come in various materials-hemp, rice, wood pulp, and flax.
- Hemp: Adds a mild, earthy flavor and is sturdy, making it good for beginners.
- Rice: Extremely thin and tasteless, burning very slowly, but can be slippery and harder to grip.
- Wood Pulp: The classic white paper. It’s thicker and easiest to roll but produces more ash.
- The Crutch (Filter Tip): A small piece of card stock used as a mouthpiece. It is not a filter in the cigarette sense; rather, it provides structural stability, prevents you from burning your lips, and stops loose herb (like Shake & Trim) from being inhaled.
- A Grinder: While you can pick apart bud by hand, a grinder creates a uniform consistency that ensures an even burn.
- A Poker/Packing Tool: A pen, a shoelace aglet, or a specialized tool to pack the flower down after rolling.
- A Rolling Tray: Essential for catching the bits of flower that inevitably fall during the process.
Part 2: The Foundation – The Grind and The Crutch
The Grind Consistency
The consistency of your cannabis is the single most important factor in how your joint burns.
- Too Fine: If you grind it into a powder, air cannot pass through the joint. It will feel like trying to suck a milkshake through a coffee stirrer.
- Too Chunky: Large nuggets create air pockets. The fire will race through these pockets, causing the joint to “canoe” (burn only on one side).
You want a consistency similar to dried oregano or coarse sea salt. It should be fluffy and airy. If you are using sticky, resinous strains like Jet Fuel Gelato, turn the grinder upside down for the first few twists to ensure a finer chop before letting it fall into the chamber.
The Art of the Crutch (Filter)
Many beginners skip the crutch, but this is a mistake. A crutch acts as the handle of the joint. It allows you to smoke the entire joint without burning your fingers (the “roach”) and ensures the airway remains open even when the paper gets wet.
How to make a “W” Filter:
- Take a strip of filter paper (or a business card strip approx. 2cm x 6cm).
- Accordion-fold the first few millimeters of the strip into an “M” or “W” shape.
- Roll the remaining length of the strip around that “W” shape.
- The result should be a cylinder with a zigzag in the center. This zigzag blocks plant matter from entering your mouth while allowing maximum airflow.

Visualizing the process: From the whole AAAA bud to the grind, the fill, and the final rolled joint.
Part 3: The Rolling Process
Now that your materials are prepped, it is time to roll. We will focus on the standard cone shape, which holds more cannabis and burns smoother than a straight cigarette-style roll.
Step 1: Loading the Paper
Hold the rolling paper between your fingers with the gum strip (the shiny adhesive line) facing you and at the top. It should form a “U” or trough shape.
Place your pre-rolled crutch at one end of the paper (usually the left side if you are right-handed). Use your thumb and index finger to pinch the paper against the crutch. This is your anchor point.
Sprinkle your ground cannabis into the trough. If you are using a potent strain like God’s Green Crack, distribute it so there is less weed near the crutch and more towards the tip. This cone geometry helps the joint burn cooler as it gets shorter.
Step 2: The Shape and Tuck
This is the step where 90% of mistakes happen. You are not trying to roll the paper over the weed yet; you are trying to shape the weed inside the paper.
- Pick up the unrolled joint with both hands. Your thumbs should be on the front, index fingers on the back.
- Start a rocking motion. Rub your thumbs and index fingers together, moving the paper up and down. This compresses the cannabis into a log shape.
- Continue this motion until the cannabis feels firm and cylindrical, not loose.
Step 3: The Catch (The Critical Moment)
Once the herb is shaped, you need to tuck the un-gummed side of the paper over the weed and under the gummed side.
- Focus on the crutch end. Use your thumb to tuck the paper tightly around the filter. If the paper is tight around the filter, the rest of the joint will follow.
- Once the paper is tucked behind the weed, use your thumbs to roll the rest of the paper upward.
- Do not worry if the tip end is messy; the structure comes from the crutch end.
Step 4: The Lick and Seal
You should now have the gum strip exposed. Lick the strip gently-you don’t need to soak it, just activate the adhesive.
Rotate the joint until the gum meets the body of the roll. Seal it from the crutch end up to the tip. Run your finger along the seam to ensure it is fully stuck.
Step 5: The Pack and Twist
You now have a loose joint. It’s time to tighten it up.
- Stand the joint upright (crutch on the table).
- Tap it gently on the table to let gravity settle the weed.
- Use your poker tool to gently compress the weed from the top. Do not pack it too tight, or you will restrict airflow.
- If the joint seems half-empty now, add some leftover Shake/Trim or top it off with more flower.
- Once filled, twist the excess paper at the tip to close it. This creates a fuse for lighting.
Part 4: Troubleshooting Common Issues
Even experienced rollers run into issues. Here is how to diagnose and fix a bad joint.
The Problem: “Canoeing” or “Running”
Symptoms: One side of the joint burns rapidly while the other side remains green, creating a shape like a canoe. Cause: This is usually caused by uneven airflow. If you packed one side tighter than the other, the fire will follow the path of least resistance (the loose side). The Fix:
- Prevention: Ensure an even grind using quality flower like Super Boof and rotate the joint while packing it.
- Mid-Smoke: Lick your finger and moisten the side of the paper that is burning too fast. The moisture slows down the burn on that side, allowing the slower side to catch up.
The Problem: The Joint Keeps Going Out
Symptoms: You have to re-light the joint after every puff. Cause: The weed is either too wet, or you packed it too tightly. If it’s too tight, oxygen can’t feed the cherry. The Fix: Use a toothpick or a very thin poker to poke a hole down the center of the joint from the top. This creates a central airflow channel.
Part 5: Rolling Styles and Advanced Techniques
Once you master the standard cone, you can experiment with different styles using items from the Get My High Shop.
The “Donut” or “Hash Hole”
For an extra kick, experienced users add a snake of concentrate into the middle of the joint.
- Lay your flower down as usual.
- Take a small amount of Wizard Weed Live Resin or Shatter and roll it into a thin “snake.”
- Place the snake in the center of the weed and cover it with more flower.
- Roll as normal. As it burns, the concentrate melts, creating a “donut” hole of burning oil in the center of the ash.
The “Inside-Out” or “Backroll”
This technique is favored by flavor chasers because it uses less paper.
- Flip the paper so the gum strip is on the outside and facing away from you.
- Roll as normal.
- When you seal it, the gum will stick to the layer of paper underneath it.
- Burn or tear off the excess paper flag.
- Result: You smoke only one layer of paper, resulting in a cleaner taste, perfect for delicate strains like Scented Marker.
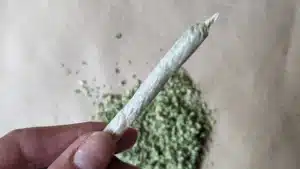
The final result: A tightly packed joint held up for inspection before the final twist.
The “Moonrock” Joint
If you want the highest potency possible, try breaking down Moonrocks into your joint. Be careful not to use a grinder for moonrocks, as they are too sticky. Use a knife or scissors to chop them into small pieces and mix them with your dry flower.
Part 6: Joint Etiquette
Rolling is a social activity, and smoking comes with its own set of unspoken rules. Knowing them ensures you are a welcome guest at any session.
- Roller’s Rights: The person who rolls the joint sparks the joint. It is a reward for their labor.
- Puff, Puff, Pass: The golden rule. Take two hits-one to enjoy, one to make sure it’s lit-and pass it to the left.
- Ash Before You Pass: Don’t hand someone a joint with a precarious stack of ash on the end. Gently tap it off.
- Don’t Wet the Tip: Keep your lips dry, or curl your lips inward so only skin touches the filter.
Conclusion
Rolling a joint is a motor skill, like riding a bike or shuffling cards. Your first dozen attempts might look messy. Do not get discouraged. The ritual of breaking down the flower, the tactile focus of the roll, and the satisfaction of smoking something you created is a core part of the cannabis experience.
If you don’t want to risk wasting your premium Shake/Trim to practice with. Sit down at a clean table, put on some music, and practice the tuck. Before long, your muscle memory will take over, and you will be rolling pearls with your eyes closed.
For more tips, tricks, and product guides, check out our Blog. Happy rolling!


Leave a comment
Your email address will not be published. Required fields are marked *
You must be logged in to post a comment.